Quickstart
Get started with Langflow by loading a template flow, running it, and then serving it at the /run API endpoint.
Prerequisites
-
Create an OpenAI API key
-
Create a Langflow API key
Create a Langflow API key
A Langflow API key is a user-specific token you can use with Langflow.
To create a Langflow API key, do the following:
-
In Langflow, click your user icon, and then select Settings.
-
Click Langflow API Keys, and then click Add New.
-
Name your key, and then click Create API Key.
-
Copy the API key and store it securely.
-
To use your Langflow API key in a request, set a
LANGFLOW_API_KEYenvironment variable in your terminal, and then include anx-api-keyheader or query parameter with your request. For example:# Set variable
export LANGFLOW_API_KEY="sk..."
# Send request
curl --request POST \
--url "http://LANGFLOW_SERVER_ADDRESS/api/v1/run/FLOW_ID" \
--header "Content-Type: application/json" \
--header "x-api-key: $LANGFLOW_API_KEY" \
--data '{
"output_type": "chat",
"input_type": "chat",
"input_value": "Hello"
}'
-
If you encounter the error "An API key must be passed as query or header" when attempting to sign up, see Troubleshooting.
Run the Simple Agent template flow
- In Langflow, click New Flow, and then select the Simple Agent template.
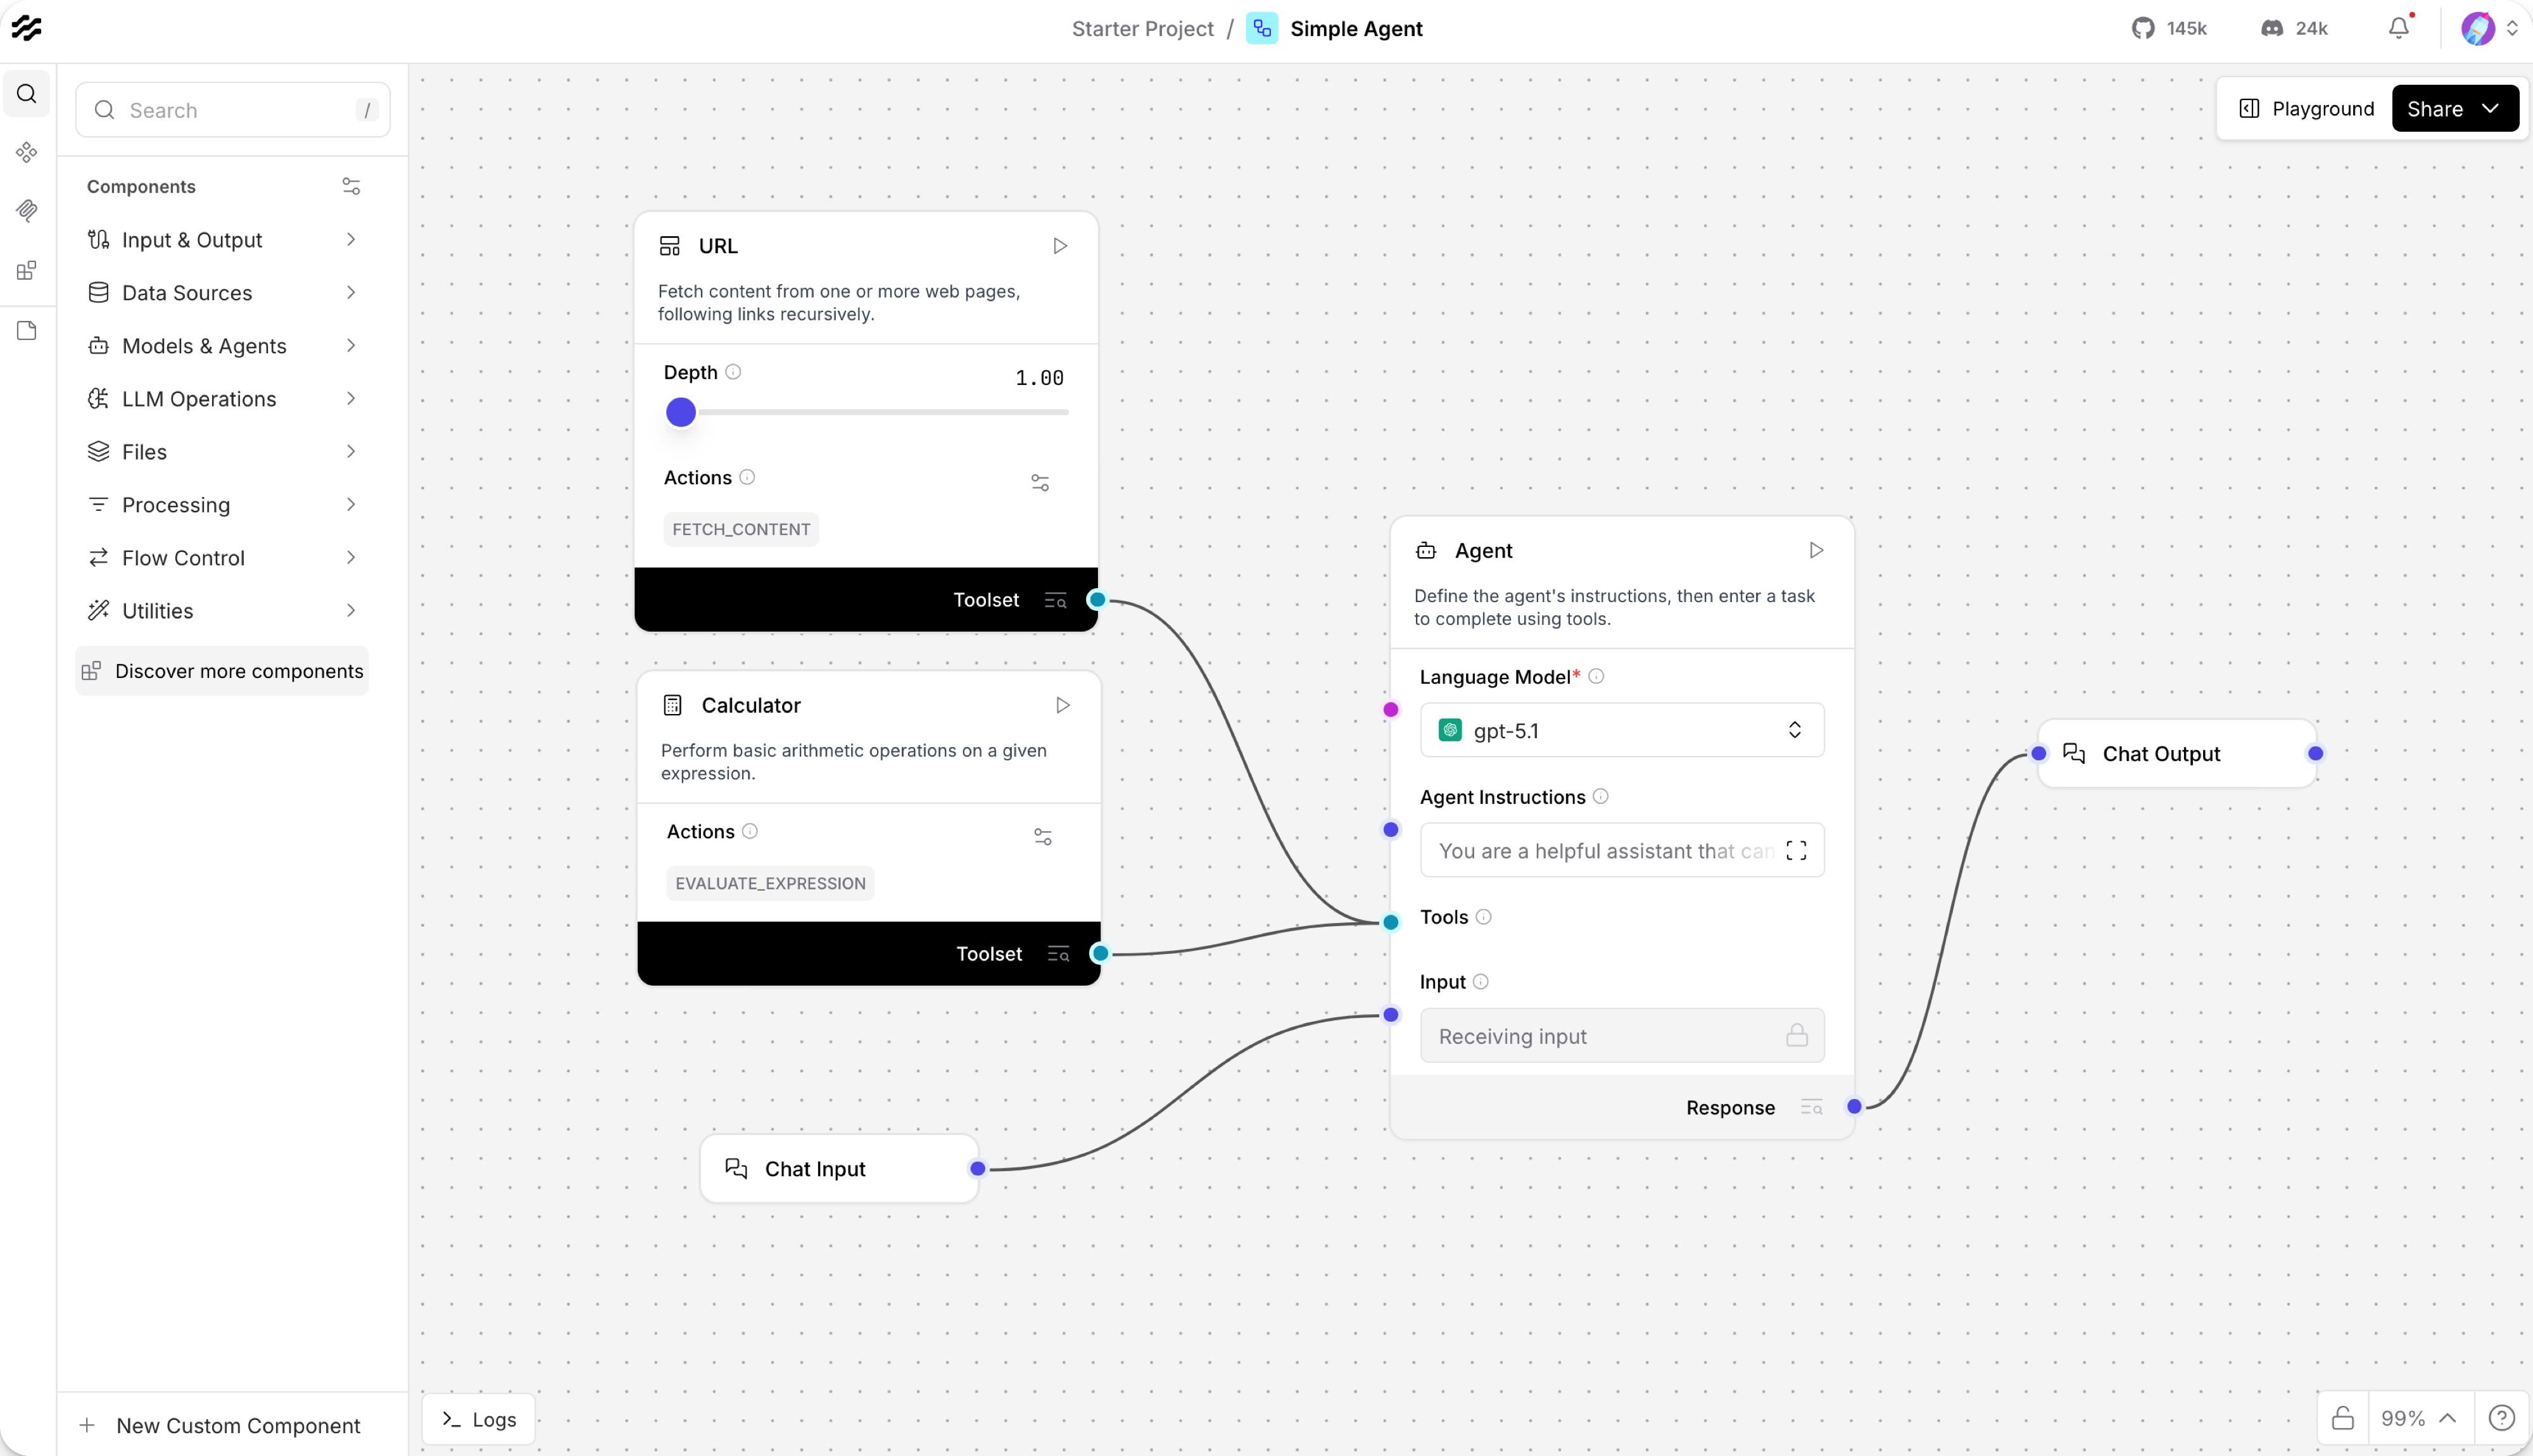
The Simple Agent template consists of an Agent component connected to Chat Input and Chat Output components, a Calculator component, and a URL component. When you run this flow, you submit a query to the agent through the Chat Input component, the agent uses the Calculator and URL tools to generate a response, and then returns the response through the Chat Output component.
Many components can be tools for agents, including Model Context Protocol (MCP) servers. The agent decides which tools to call based on the context of a given query.
-
In the Agent component, click Setup Provider to select your language model provider.
To edit Langflow's global model provider configuration, do the following:
-
To open the Model Providers pane, click your profile icon, select Settings, and then click Model Providers.
-
In the Model Providers pane, select a provider.
-
In the API Key field, add your provider's API key. Some providers require additional configuration fields. For more information, see the model provider's documentation.
The key must have permission to call the models you want to use in your flow, and your account must have sufficient credits for the actions you want to perform.
You can only add one key for each provider. Make sure the key has access to all models that you want to use in Langflow.
-
Click Save.
-
Enable the specific models that you want to use in Langflow. The available models depend on the provider and your API key's permissions. Models that generate text are listed under Language Models. Models that generate embeddings are listed under Embedding Models.
After you enable a model in Langflow's global model configuration, you can use that model in any model-driven component in your flows.
-
-
In the Agent component, select your configured model from the Language Model dropdown.
Access more models and providers
There are two ways to access more models and providers:
- Edit Langflow's global Models configuration. These providers and models are part of Langflow's core functionality. Use the Ollama provider to connect to any model hosted on a local or remote Ollama instance.
- Connect any additional language model component to the Agent component's Language Model port.
-
To run the flow, click Playground.
-
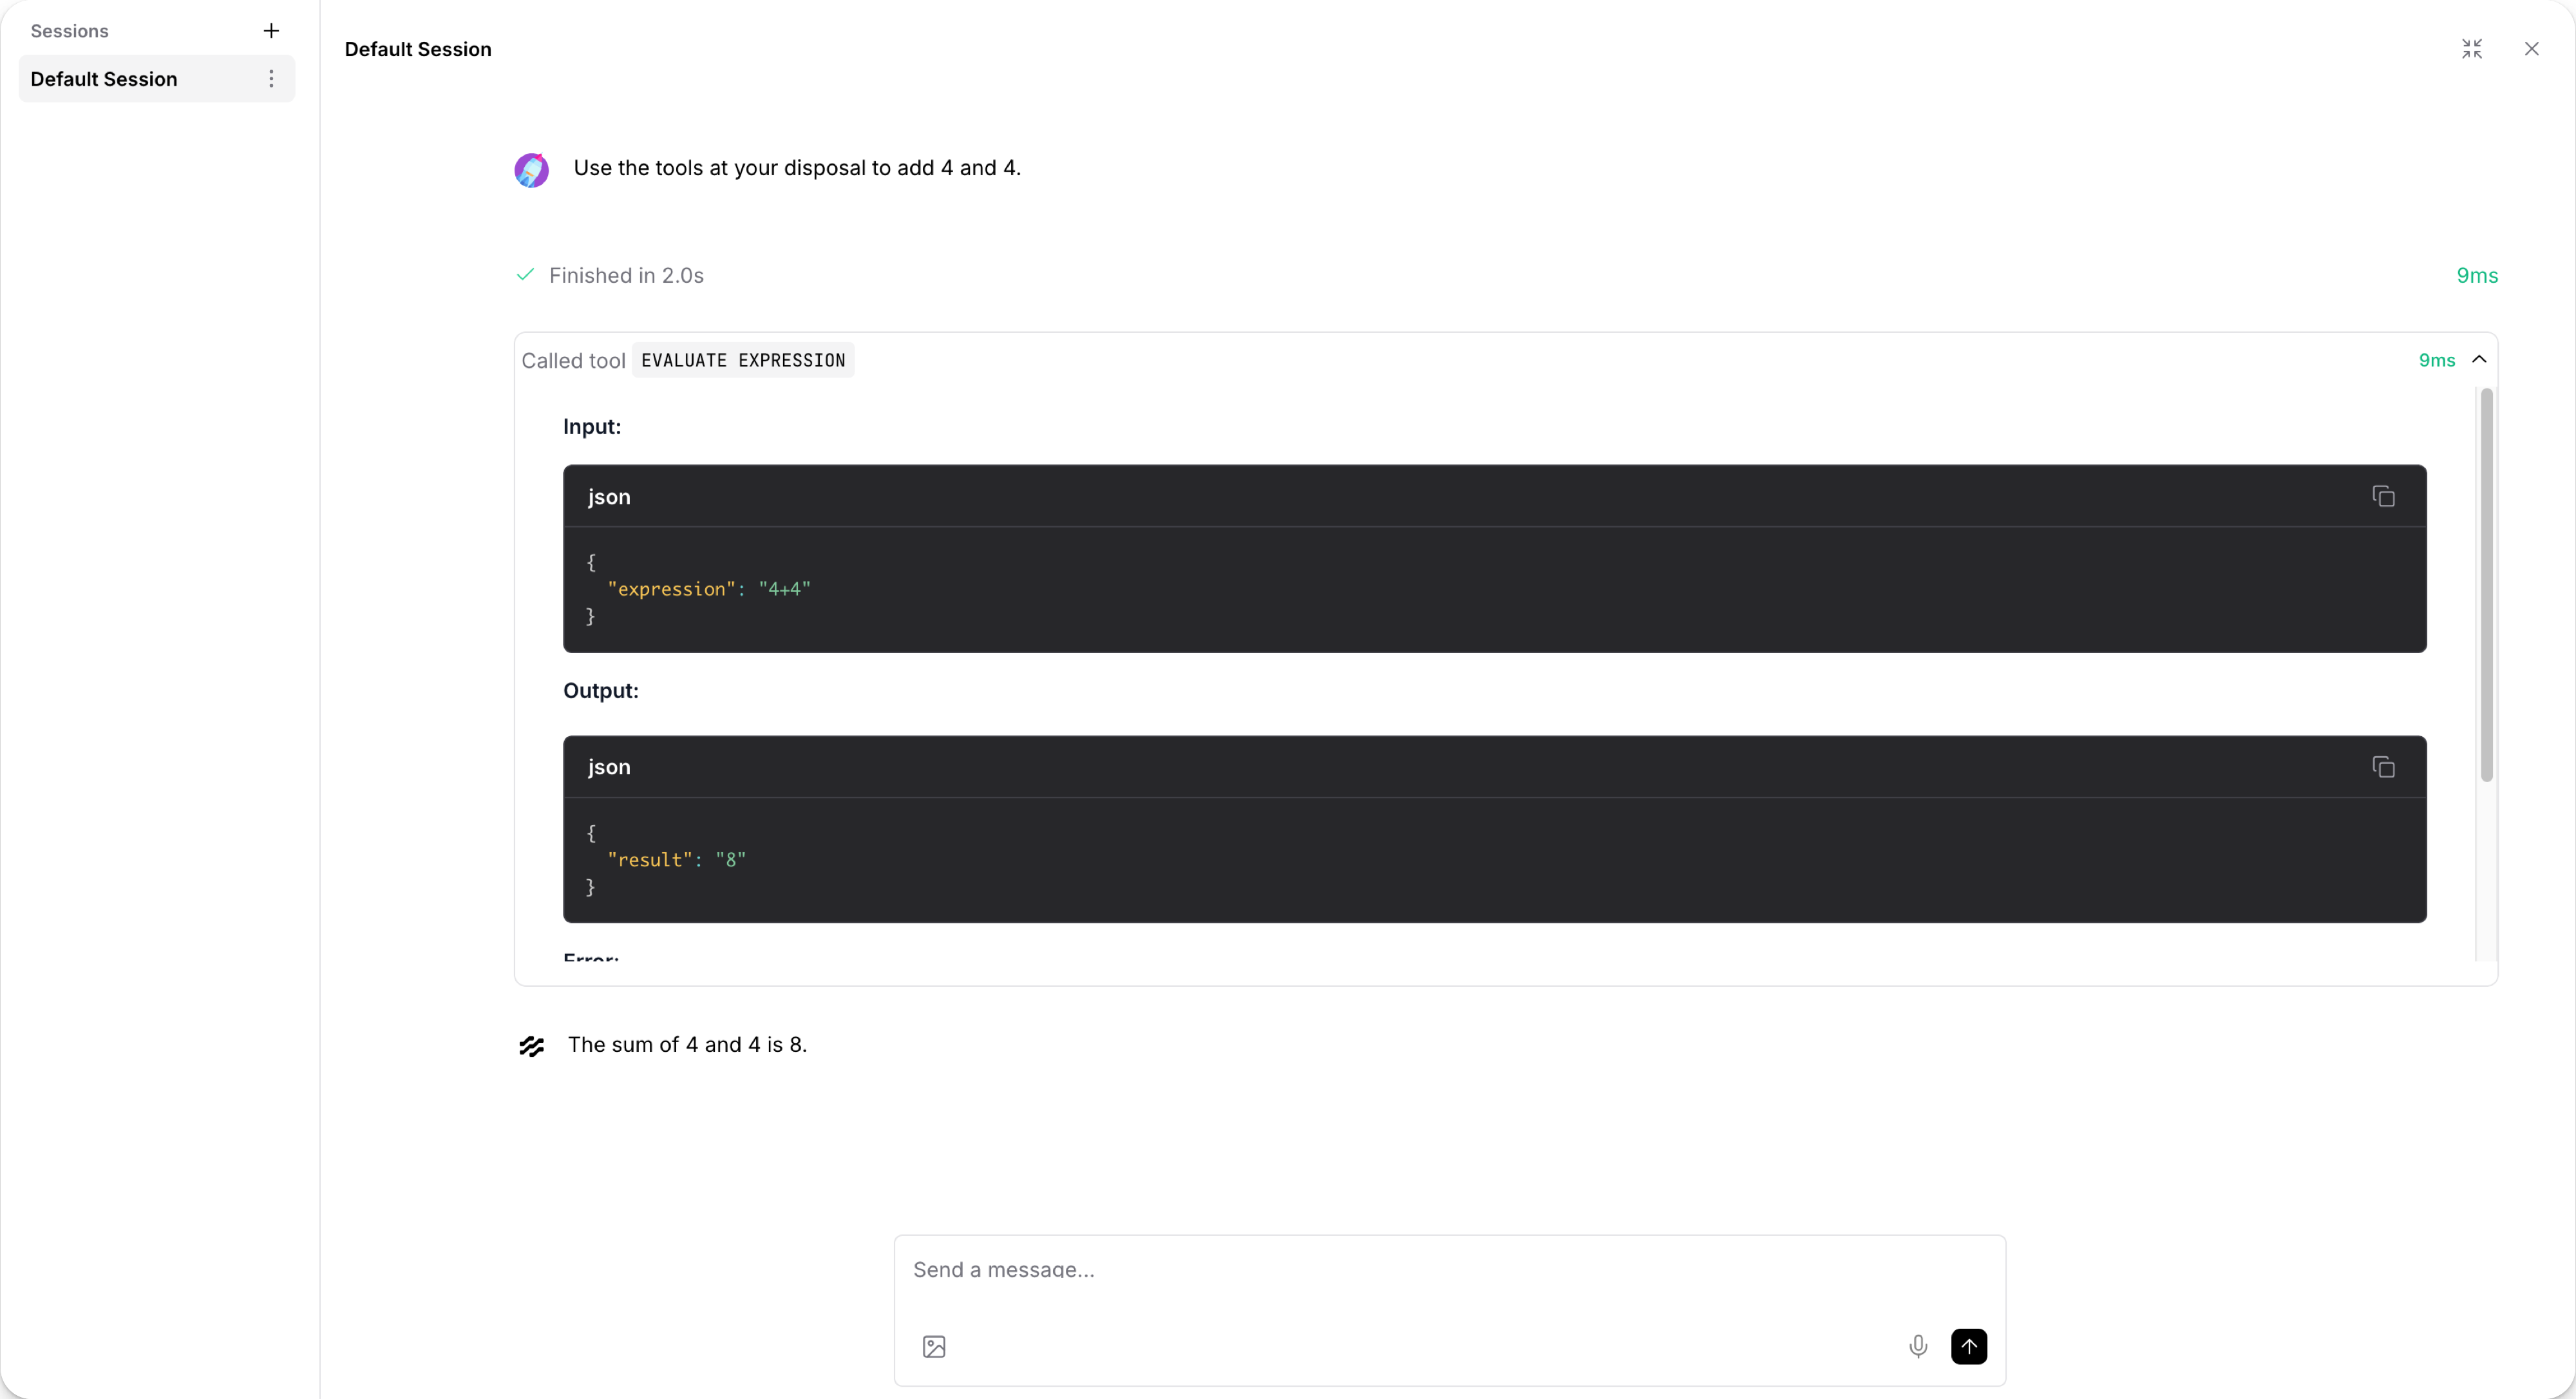
To test the Calculator tool, ask the agent a simple math question, such as
I want to add 4 and 4.To help you test and evaluate your flows, the Playground shows the agent's reasoning process as it analyzes the prompt, selects a tool, and then uses the tool to generate a response. In this case, a math question causes the agent to select the Calculator tool and use an action likeevaluate_expression.
-
To test the URL tool, ask the agent about current events. For this request, the agent selects the URL tool's
fetch_contentaction, and then returns a summary of current news headlines. -
When you are done testing the flow, click Close.
Now that you've run your first flow, try these next steps:
- Edit your Simple Agent flow by attaching different tools or adding more components to the flow.
- Build your own flows from scratch or by modifying other template flows.
- Integrate flows into your applications, as explained in Run your flows from external applications.
Run your flows from external applications
Langflow is an IDE, but it's also a runtime you can call through the Langflow API with Python, JavaScript, or HTTP.
When you start Langflow locally, you can send requests to the local Langflow server. For production applications, you need to deploy a stable Langflow instance to handle API calls.
For example, you can use the /run endpoint to run a flow and get the result.
Langflow provides code snippets to help you get started with the Langflow API.
-
When editing a flow, click Share, and then click API access.
The default code in the API access pane constructs a request with the Langflow server
url,headers, and apayloadof request data. The code snippets automatically include theLANGFLOW_SERVER_ADDRESSandFLOW_IDvalues for the flow, and a script to include yourLANGFLOW_API_KEYif you've set it as an environment variable in your terminal session. Replace these values if you're using the code for a different server or flow. The default Langflow server address ishttp://localhost:7860.- Python
- JavaScript
- curl
import requests

url = "http://LANGFLOW_SERVER_ADDRESS/api/v1/run/FLOW_ID"  # The complete API endpoint URL for this flow

# Request payload configuration
payload = {
    "output_type": "chat",
    "input_type": "chat",
    "input_value": "hello world!"
}

# Request headers
headers = {
    "Content-Type": "application/json",
    "x-api-key": "$LANGFLOW_API_KEY"
}

try:
    # Send API request
    response = requests.request("POST", url, json=payload, headers=headers)
    response.raise_for_status()  # Raise exception for bad status codes

    # Print response
    print(response.text)

except requests.exceptions.RequestException as e:
    print(f"Error making API request: {e}")
except ValueError as e:
    print(f"Error parsing response: {e}")
const payload = {
"output_type": "chat",
"input_type": "chat",
"input_value": "hello world!",
"session_id": "user_1"
};
const options = {
method: 'POST',
headers: {
'Content-Type': 'application/json',
'x-api-key': 'LANGFLOW_API_KEY'
},
body: JSON.stringify(payload)
};
fetch('http://LANGFLOW_SERVER_ADDRESS/api/v1/run/FLOW_ID', options)
.then(response => response.json())
.then(response => console.log(response))
.catch(err => console.error(err));curl --request POST \
--url 'http://LANGFLOW_SERVER_ADDRESS/api/v1/run/FLOW_ID?stream=false' \
--header 'Content-Type: application/json' \
--header "x-api-key: LANGFLOW_API_KEY" \
--data '{
"output_type": "chat",
"input_type": "chat",
"input_value": "hello world!"
}'
# A 200 response confirms the call succeeded. -
Copy the snippet, paste it in a script file, and then run the script to send the request. If you are using the curl snippet, you can run the command directly in your terminal.
If the request is successful, the response includes many details about the flow run, including the session ID, inputs, outputs, components, durations, and more. The following is an example of a response from running the Simple Agent template flow:
Result
{
  "session_id": "29deb764-af3f-4d7d-94a0-47491ed241d6",
  "outputs": [
    {
      "inputs": {
        "input_value": "hello world!"
      },
      "outputs": [
        {
          "results": {
            "message": {
              "text_key": "text",
              "data": {
                "timestamp": "2025-06-16 19:58:23 UTC",
                "sender": "Machine",
                "sender_name": "AI",
                "session_id": "29deb764-af3f-4d7d-94a0-47491ed241d6",
                "text": "Hello world! 🌍 How can I assist you today?",
                "files": [],
                "error": false,
                "edit": false,
                "properties": {
                  "text_color": "",
                  "background_color": "",
                  "edited": false,
                  "source": {
                    "id": "Agent-ZOknz",
                    "display_name": "Agent",
                    "source": "gpt-4o-mini"
                  },
                  "icon": "bot",
                  "allow_markdown": false,
                  "positive_feedback": null,
                  "state": "complete",
                  "targets": []
                },
                "category": "message",
                "content_blocks": [
                  {
                    "title": "Agent Steps",
                    "contents": [
                      {
                        "type": "text",
                        "duration": 2,
                        "header": {
                          "title": "Input",
                          "icon": "MessageSquare"
                        },
                        "text": "**Input**: hello world!"
                      },
                      {
                        "type": "text",
                        "duration": 226,
                        "header": {
                          "title": "Output",
                          "icon": "MessageSquare"
                        },
                        "text": "Hello world! 🌍 How can I assist you today?"
                      }
                    ],
                    "allow_markdown": true,
                    "media_url": null
                  }
                ],
                "id": "f3d85d9a-261c-4325-b004-95a1bf5de7ca",
                "flow_id": "29deb764-af3f-4d7d-94a0-47491ed241d6",
                "duration": null
              },
              "default_value": "",
              "text": "Hello world! 🌍 How can I assist you today?",
              "sender": "Machine",
              "sender_name": "AI",
              "files": [],
              "session_id": "29deb764-af3f-4d7d-94a0-47491ed241d6",
              "timestamp": "2025-06-16T19:58:23+00:00",
              "flow_id": "29deb764-af3f-4d7d-94a0-47491ed241d6",
              "error": false,
              "edit": false,
              "properties": {
                "text_color": "",
                "background_color": "",
                "edited": false,
                "source": {
                  "id": "Agent-ZOknz",
                  "display_name": "Agent",
                  "source": "gpt-4o-mini"
                },
                "icon": "bot",
                "allow_markdown": false,
                "positive_feedback": null,
                "state": "complete",
                "targets": []
              },
              "category": "message",
              "content_blocks": [
                {
                  "title": "Agent Steps",
                  "contents": [
                    {
                      "type": "text",
                      "duration": 2,
                      "header": {
                        "title": "Input",
                        "icon": "MessageSquare"
                      },
                      "text": "**Input**: hello world!"
                    },
                    {
                      "type": "text",
                      "duration": 226,
                      "header": {
                        "title": "Output",
                        "icon": "MessageSquare"
                      },
                      "text": "Hello world! 🌍 How can I assist you today?"
                    }
                  ],
                  "allow_markdown": true,
                  "media_url": null
                }
              ],
              "duration": null
            }
          },
          "artifacts": {
            "message": "Hello world! 🌍 How can I assist you today?",
            "sender": "Machine",
            "sender_name": "AI",
            "files": [],
            "type": "object"
          },
          "outputs": {
            "message": {
              "message": "Hello world! 🌍 How can I assist you today?",
              "type": "text"
            }
          },
          "logs": {
            "message": []
          },
          "messages": [
            {
              "message": "Hello world! 🌍 How can I assist you today?",
              "sender": "Machine",
              "sender_name": "AI",
              "session_id": "29deb764-af3f-4d7d-94a0-47491ed241d6",
              "stream_url": null,
              "component_id": "ChatOutput-aF5lw",
              "files": [],
              "type": "text"
            }
          ],
          "timedelta": null,
          "duration": null,
          "component_display_name": "Chat Output",
          "component_id": "ChatOutput-aF5lw",
          "used_frozen_result": false
        }
      ]
    }
  ]
}
In a production application, you probably want to select parts of this response to return to the user, store in logs, and so on. The next steps demonstrate how you can extract data from a Langflow API response to use in your application.
Extract data from the response
The following example builds on the API pane's example code to create a question-and-answer chat in your terminal that stores the agent's previous answer.
-
Incorporate your Simple Agent flow's
/runsnippet into the following script. This script runs a question-and-answer chat in your terminal and stores the agent's previous answer so you can compare them.- Python
- JavaScript
import requests
import json

url = "http://LANGFLOW_SERVER_ADDRESS/api/v1/run/FLOW_ID"

def ask_agent(question):
    payload = {
        "output_type": "chat",
        "input_type": "chat",
        "input_value": question,
    }

    headers = {
    "Content-Type": "application/json",
    "x-api-key": "LANGFLOW_API_KEY"
    }

    try:
        response = requests.post(url, json=payload, headers=headers)
        response.raise_for_status()

        # Get the response message
        data = response.json()
        message = data["outputs"][0]["outputs"][0]["outputs"]["message"]["message"]
        return message

    except Exception as e:
        return f"Error: {str(e)}"

def extract_message(data):
    try:
        return data["outputs"][0]["outputs"][0]["outputs"]["message"]["message"]
    except (KeyError, IndexError):
        return None

# Store the previous answer from ask_agent response
previous_answer = None

# the terminal chat
while True:
    # Get user input
    print("\nAsk the agent anything, such as 'What is 15 * 7?' or 'What is the capital of France?')")
    print("Type 'quit' to exit or 'compare' to see the previous answer")
    user_question = input("Your question: ")

    if user_question.lower() == 'quit':
        break
    elif user_question.lower() == 'compare':
        if previous_answer:
            print(f"\nPrevious answer was: {previous_answer}")
        else:
            print("\nNo previous answer to compare with!")
        continue

    # Get and display the answer
    result = ask_agent(user_question)
    print(f"\nAgent's answer: {result}")
    # Store the answer for comparison
    previous_answer = result
const readline = require('readline');
const rl = readline.createInterface({
input: process.stdin,
output: process.stdout
});
const url = 'http://LANGFLOW_SERVER_ADDRESS/api/v1/run/FLOW_ID';
// Store the previous answer from askAgent response
let previousAnswer = null;
// the agent flow, with question as input_value
async function askAgent(question) {
const payload = {
"output_type": "chat",
"input_type": "chat",
"input_value": question
};
const options = {
method: 'POST',
headers: {
'Content-Type': 'application/json',
'x-api-key': 'LANGFLOW_API_KEY'
},
body: JSON.stringify(payload)
};
try {
const response = await fetch(url, options);
const data = await response.json();
// Extract the message from the nested response
const message = data.outputs[0].outputs[0].outputs.message.message;
return message;
} catch (error) {
return `Error: ${error.message}`;
}
}
// the terminal chat
async function startChat() {
console.log("\nAsk the agent anything, such as 'What is 15 * 7?' or 'What is the capital of France?'");
console.log("Type 'quit' to exit or 'compare' to see the previous answer");
const askQuestion = () => {
rl.question('\nYour question: ', async (userQuestion) => {
if (userQuestion.toLowerCase() === 'quit') {
rl.close();
return;
}
if (userQuestion.toLowerCase() === 'compare') {
if (previousAnswer) {
console.log(`\nPrevious answer was: ${previousAnswer}`);
} else {
console.log("\nNo previous answer to compare with!");
}
askQuestion();
return;
}
const result = await askAgent(userQuestion);
console.log(`\nAgent's answer: ${result}`);
previousAnswer = result;
askQuestion();
});
};
askQuestion();
}
startChat(); -
To view the agent's previous answer, type
compare. To close the terminal chat, typeexit.
Use tweaks to apply temporary overrides to a flow run
You can include tweaks with your requests to temporarily modify flow parameters. Tweaks are added to the API request, and temporarily change component parameters within your flow. Tweaks override the flow's components' settings for a single run only. They don't modify the underlying flow configuration or persist between runs.
Tweaks are added to the /run endpoint's payload.
To assist with formatting, you can define tweaks in Langflow's Input Schema pane before copying the code snippet.
- To open the Input Schema pane, from the API access pane, click Input Schema.
- In the Input Schema pane, select the parameter you want to modify in your next request. Enabling parameters in the Input Schema pane doesn't permanently change the listed parameters. It only adds them to the sample code snippets.
- For example, to change the agent's LLM model from OpenAI to Anthropic and include your Anthropic API key with the request, select the Agent component in the Input Schema pane and enable the Language Model field.
Langflow updates the tweaks object in the code snippets based on your input parameters, and includes default values to guide you.
Use the updated code snippets in your script to run your flow with your overrides.
payload = {
    "output_type": "chat",
    "input_type": "chat",
    "input_value": "hello world!",
    "tweaks": {
        "Agent-ZOknz": {
            "agent_llm": "Anthropic",
            "api_key": "ANTHROPIC_API_KEY",
            "model_name": "claude-opus-4-5-20251101"
        }
    }
}
Next steps
Was this page helpful?