Manage vector data
Vector data is critical to AI applications. Langflow provides several components to help you store and retrieve vector data in your flows, including embedding models, vector stores, and knowledge bases.
Embedding models
Embedding model components generate text embeddings using a specified Large Language Model (LLM).
There are two common use cases for these components:
- Store vectors: Generate embeddings for content written to a vector database.
- Search vectors: Generate an embedding from a query to run a similarity search.
In both cases the embedding model component is attached to a vector store component. For more information, examples, and available options, see Embedding model components.
Alternatively, you can use knowledge bases, which include built-in support for several embedding models.
Vector stores
Vector store components read and write to vector databases. Typically, these components connect to remote databases, but some vector store components support local databases.
By design, vector data is essential for LLM applications, such as chatbots and agents.
While you can use an LLM alone for generic chat interactions and common tasks, you can take your application to the next level with context sensitivity (such as RAG) and custom datasets (such as internal business data). This often requires integrating vector databases and vector searches that provide the additional context and define meaningful queries.
Langflow includes vector store components that can read and write vector data, including embedding storage, similarity search, Graph RAG traversals, and dedicated search instances like OpenSearch. Because of their interdependent functionality, it is common to use vector store, language model, and embedding model components in the same flow or in a series of dependent flows.
To find available vector store components, browse Bundles or Search for your preferred vector database provider.
Example: Vector search flow
For a tutorial that uses vector data in a flow, see Create a vector RAG chatbot.
The following example demonstrates how to use vector store components in flows alongside related components like embedding model and language model components. These steps walk through important configuration details, functionality, and best practices for using these components effectively. This is only one example; it isn't a prescriptive guide to all possible use cases or configurations.
-
Create a flow with the Vector Store RAG template.
This template has two subflows. The Load Data subflow loads embeddings and content into a vector database, and the Retriever subflow runs a vector search to retrieve relevant context based on a user's query.
-
Configure the database connection for both Astra DB components, or replace them with another pair of vector store components of your choice. Make sure the components connect to the same vector store, and that the component in the Retriever subflow is able to run a similarity search.
The parameters you set in each vector store component depend on the component's role in your flow. In this example, the Load Data subflow writes to the vector store, whereas the Retriever subflow reads from the vector store. Therefore, search-related parameters are only relevant to the Vector Search component in the Retriever subflow.
For information about specific parameters, see the documentation for your chosen vector store component.
-
To configure the embedding model, do one of the following:
-
Use an OpenAI model: In both OpenAI Embeddings components, enter your OpenAI API key. You can use the default model or select a different OpenAI embedding model.
-
Use another provider: Replace the OpenAI Embeddings components with another pair of embedding model components of your choice, and then configure the parameters and credentials accordingly.
-
Use Astra DB vectorize: If you are using an Astra DB vector store that has a vectorize integration, you can remove both OpenAI Embeddings components. If you do this, the vectorize integration automatically generates embeddings from the Ingest Data (in the Load Data subflow) and Search Query (in the Retriever subflow).
tipIf your vector store already contains embeddings, make sure your embedding model components use the same model as your previous embeddings. Mixing embedding models in the same vector store can produce inaccurate search results.
-
-
Recommended: In the Split Text component, optimize the chunking settings for your embedding model. For example, if your embedding model has a token limit of 512, then the Chunk Size parameter must not exceed that limit.
Additionally, because the Retriever subflow passes the chat input directly to the vector store component for vector search, make sure that your chat input string doesn't exceed your embedding model's limits. For this example, you can enter a query that is within the limits; however, in a production environment, you might need to implement additional checks or preprocessing steps to ensure compliance. For example, use additional components to prepare the chat input before running the vector search, or enforce chat input limits in your application code.
-
In the Language Model component, enter your OpenAI API key, or select a different provider and model to use for the chat portion of the flow.
-
Run the Load Data subflow to populate your vector store. In the Read File component, select one or more files, and then click Run component on the vector store component in the Load Data subflow.
The Load Data subflow loads files from your local machine, chunks them, generates embeddings for the chunks, and then stores the chunks and their embeddings in the vector database.
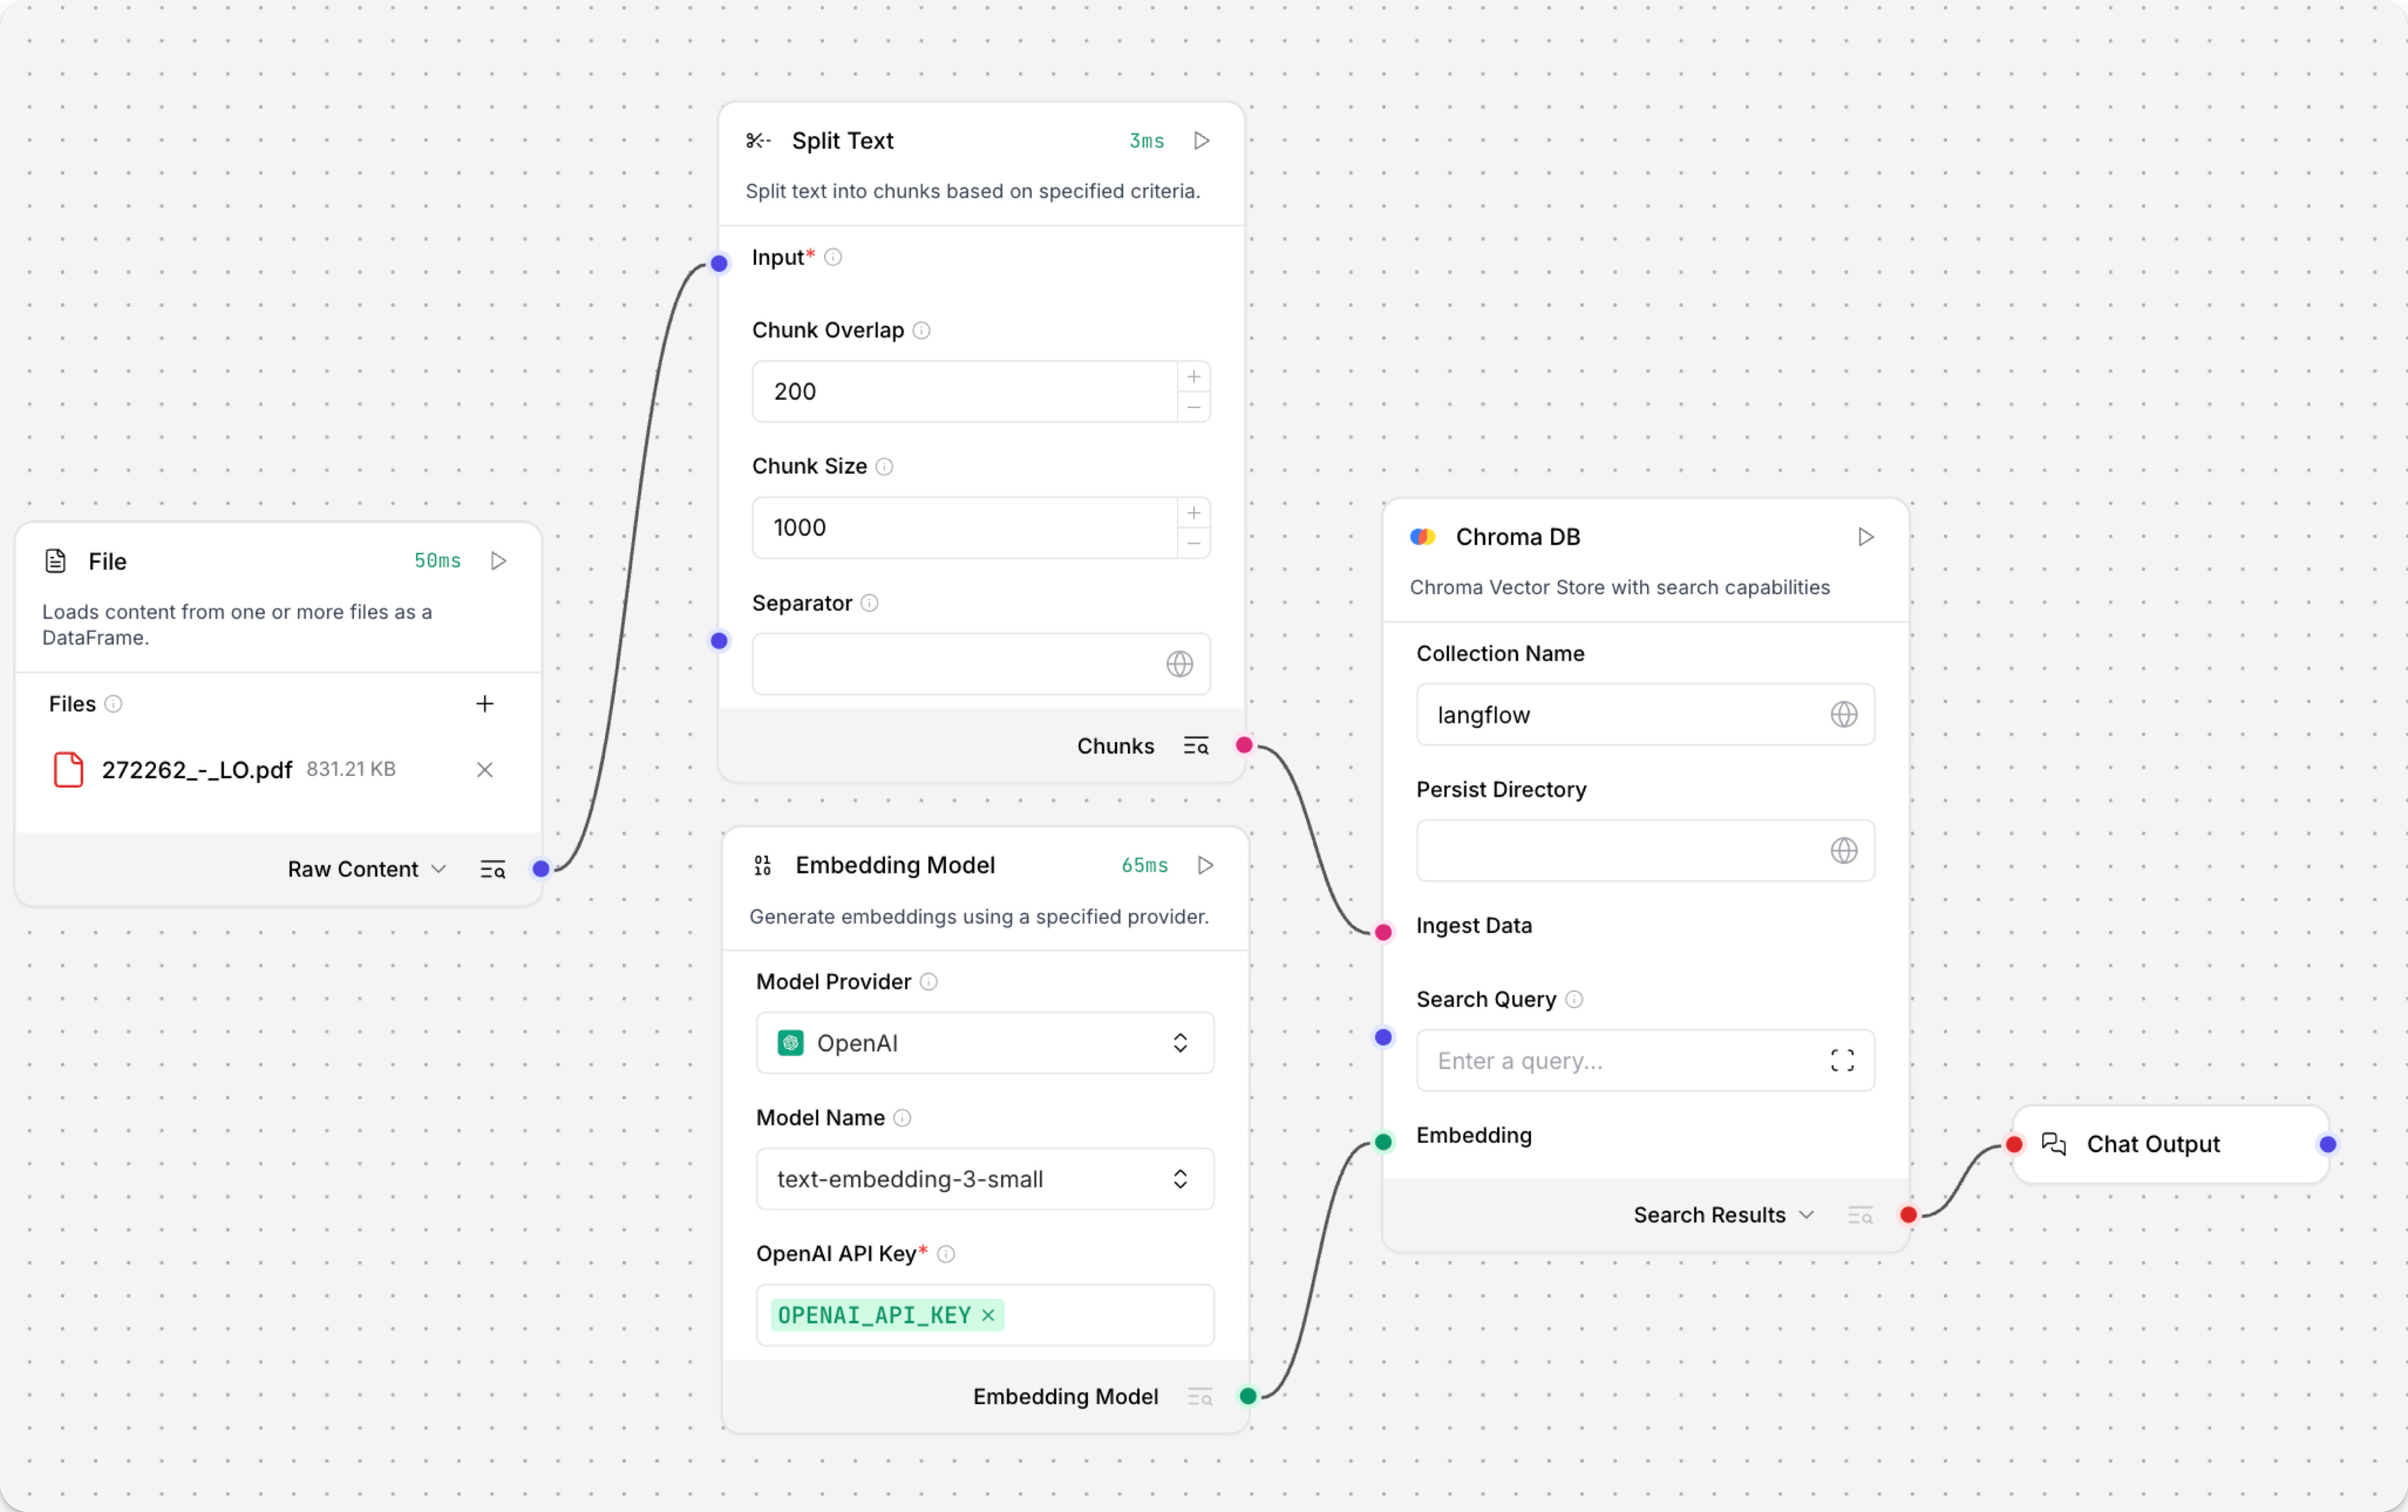
The Load Data subflow is separate from the Retriever subflow because you probably won't run it every time you use the chat. You can run the Load Data subflow as needed to preload or update the data in your vector store. Then, your chat interactions only use the components that are necessary for chat.
If your vector store already contains data that you want to use for vector search, then you don't need to run the Load Data subflow.
-
Open the Playground and start chatting to run the Retriever subflow.
The Retriever subflow generates an embedding from chat input, runs a vector search to retrieve similar content from your vector store, parses the search results into supplemental context for the LLM, and then uses the LLM to generate a natural language response to your query. The LLM uses the vector search results along with its internal training data and tools, such as basic web search and datetime information, to produce the response.
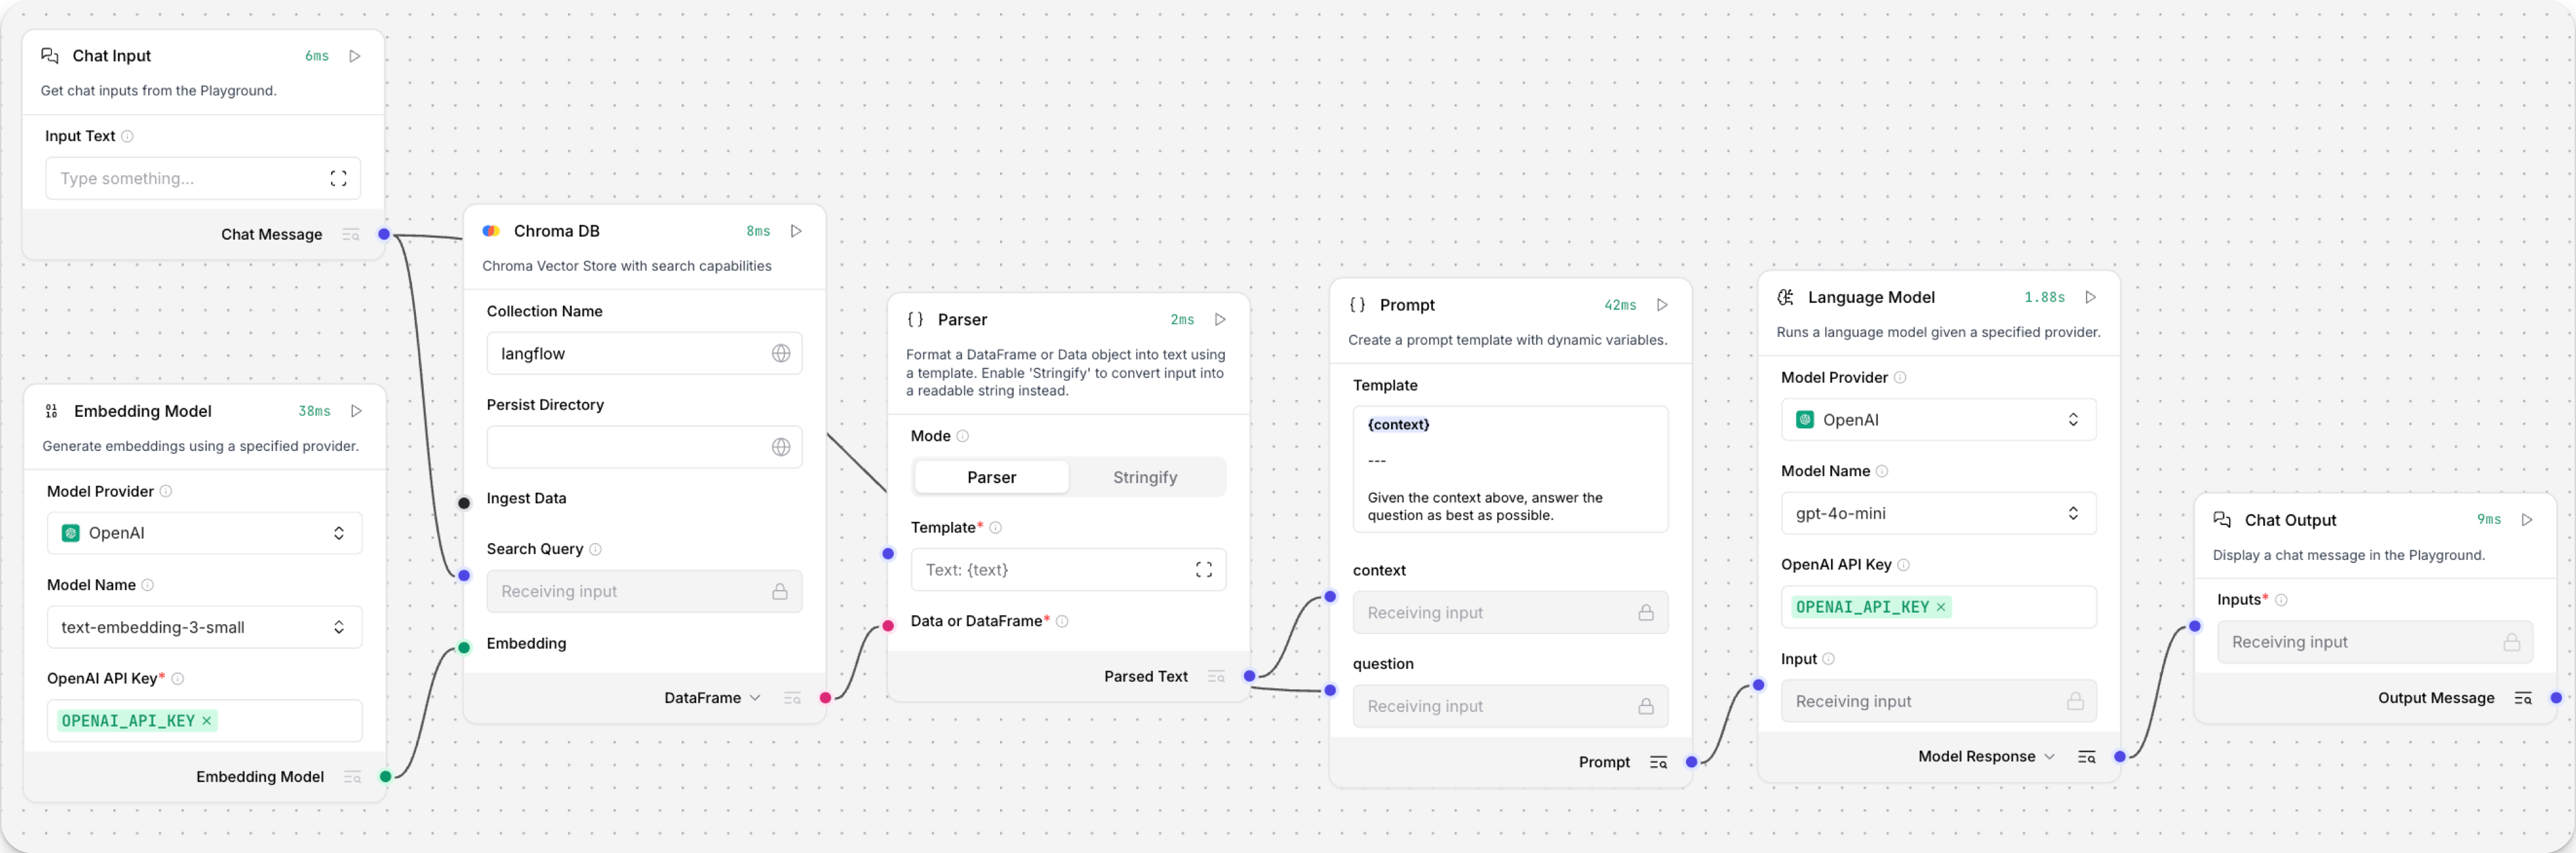
To avoid passing the entire block of raw search results to the LLM, the Parser component extracts
textstrings from the search resultsJSONobject, and then passes them to the Prompt Template component inMessageformat. From there, the strings and other template content are compiled into natural language instructions for the LLM.You can use other components for this transformation, such as the JSON Operations component, depending on how you want to use the search results.
To view the raw search results, click Inspect output on the vector store component after running the Retriever subflow.
Knowledge bases
A Langflow knowledge base is a vector database that stores embeddings for use in your flows. By default, knowledge bases use Chroma as a local vector store, but you can configure an external vector database provider such as OpenSearch. For more information, see Configure vector database providers.
Because knowledge bases don't re-ingest data with every flow run, they can be more efficient than using a remote vector database. They are a good choice for flows that use custom, domain-specific datasets, like slices of customer and product data.
You can use knowledge base components in much the same way that you use vector store components. However, there are several key differences:
- Local storage by default: Langflow knowledge bases use Chroma local storage by default. In contrast, only some vector store components support local databases.
- Built-in embedding models: Langflow knowledge bases include built-in support for several embedding models. Other models aren't supported for use with knowledge bases. To use a different provider or model, you must use a vector store component along with your preferred embedding model component.
- Basic similarity search: When querying Langflow knowledge bases, only standard similarity search is supported. For more advanced searches, you must use a vector store component for a vector database provider that supports your desired functionality.
- Structured data: Langflow knowledge bases only support structured data. For unstructured data, you must use a compatible vector store component.
Create a knowledge base
In this example, you'll create a knowledge base of chunked customer orders.
To follow along with this example, download customer-orders.csv to your local machine, or adapt the steps for your own structured data.
-
On the Projects page page, click Knowledge below the list of projects to view and manage your knowledge bases.
-
To create a new knowledge base, click Add Knowledge.
-
In the Create Knowledge Base pane, enter a name for your knowledge base, select an embedding model, and select a DB Provider.
To edit Langflow's global model provider configuration, do the following:
-
To open the Model Providers pane, click your profile icon, select Settings, and then click Model Providers.
-
In the Model Providers pane, select a provider.
-
In the API Key field, add your provider's API key. Some providers require additional configuration fields. For more information, see the model provider's documentation.
The key must have permission to call the models you want to use in your flow, and your account must have sufficient credits for the actions you want to perform.
You can only add one key for each provider. Make sure the key has access to all models that you want to use in Langflow.
-
Click Save.
-
Enable the specific models that you want to use in Langflow. The available models depend on the provider and your API key's permissions. Models that generate text are listed under Language Models. Models that generate embeddings are listed under Embedding Models.
After you enable a model in Langflow's global model configuration, you can use that model in any model-driven component in your flows.
The DB Provider determines where embeddings are stored. It defaults to the provider configured in Settings → DB Providers. Existing knowledge bases keep their original backend, so changing the global DB Provider only affects new knowledge bases.
Once you create a knowledge base, you cannot change its embedding model or DB provider. If you need to change either, you must delete and recreate the knowledge base.
-
-
Optional: Add Custom Metadata Fields to tag every chunk with additional context. For example, if you're ingesting files from multiple teams, add a field
teamwith a value ofsupport. When the Knowledge Base component searches, you can then filter results to only return chunks whereteamequalssupportto keep results scoped to the support team's content. -
To configure sources for your knowledge base, click Configure Sources. Optionally, to create an empty knowledge base, click Create.
-
In the Configure Sources pane, configure the sources for your knowledge base's data, and also how the embedded data will be chunked for vector search retrieval. For this example, click Add Sources, and then select the downloaded
customer-orders.csvfile from your local machine. The default settings for Chunk Size, Chunk Overlap, and Separator are fine. To continue, click Next Step. -
The Review & Build pane allows you to preview your first chunk before you commit to spending tokens to embed all of the data into the knowledge base. A typical chunk size is 512–1000 characters. Smaller chunks support more granular retrieval but they can lose context across chunks. If the chunk isn't what you want to embed, click Back to configure your chunking strategy. To embed this data, click Create.
-
Your data is embedded as a Knowledge. When it is available to use, the Status changes to Ready.
To use the new knowledge base in a flow, see Use the Knowledge Base component in a flow.
Manage knowledge bases
On the Projects page page, click Knowledge below the list of projects to view and manage your knowledge bases.
For each knowledge base, you can see the following information:
- Name
- Embedding model
- Size on disk
- Number of words, characters, and chunks
- The average length and size of chunks
- The knowledge base's status
The icon next to the knowledge base name indicates the source file type:
- Red — PDF
- Green — CSV
- Purple — plain text (
.txt) - Fuchsia — Markdown (
.md,.mdx) - Yellow — HTML
- Blue — code files (
.py,.js,.ts) - Indigo — JSON
- — multiple source types
Chunking behavior is determined by the embedding model, and the embedding model is set when you create the knowledge base. If you need to change the embedding model, you must delete and recreate the knowledge base.
To update a knowledge base with , click More, and then select Update Knowledge Base.
To view a knowledge base's chunks, click More, and then select View Chunks.
To delete a knowledge base, click More, and then click Delete. If any flows use the deleted knowledge base, you must update them to use a different knowledge base.
For more information on using knowledge bases in a flow, see the Knowledge Base component documentation.
Configure vector database providers
DB Providers are the vector databases where your knowledge bases store and search embeddings. To configure these providers, go to Settings → DB Providers. The selected provider applies to all new knowledge bases you create. Existing knowledge bases continue to use the provider that was active when they were created.
Chroma (default)
By default, knowledge bases use ChromaDB as a local vector store, with no additional setup required. Knowledge bases are stored local to your Langflow instance. The default storage location depends on your operating system and installation method:
- Langflow Desktop:
- macOS:
/Users/<username>/.langflow/knowledge_bases - Windows:
C:\Users\<name>\AppData\Roaming\com.LangflowDesktop\knowledge_bases
- macOS:
- Langflow OSS:
- macOS/Windows/Linux/WSL with
uv pip install:<path_to_venv>/lib/python3.12/site-packages/langflow/knowledge_bases(Python version can vary. Knowledge bases aren't shared between virtual environments.) - macOS/Windows/Linux/WSL with
git clone:<path_to_clone>/src/backend/base/langflow/knowledge_bases
- macOS/Windows/Linux/WSL with
If you set the LANGFLOW_CONFIG_DIR environment variable, the knowledge_bases subdirectory is created relative to that path.
To change the default knowledge_bases directory path, set the LANGFLOW_KNOWLEDGE_BASES_DIR environment variable:
export LANGFLOW_KNOWLEDGE_BASES_DIR="/path/to/parent/directory"
Chroma Cloud
To use Chroma Cloud as a database provider, you need a Chroma Cloud account and an API key from Chroma Cloud.
-
From your Chroma Cloud dashboard, copy your API Key, Tenant, and Database names.
-
To connect Chroma Cloud to Langflow, click Settings, and then click DB Providers.
-
Select Chroma Cloud.
-
Enter the following values:
- API Key: Enter your Chroma Cloud API key.
- Tenant: Optionally, enter your tenant name. If blank, defaults to the tenant associated with your API key.
- Database: Optionally, enter your database name. If blank, defaults to
default_database. - Region: Optionally, enter your cloud region.
-
Click Save and Use Chroma Cloud.
Optionally, click Test Connection to verify that Langflow can reach your Chroma Cloud instance before saving.
The Chroma Cloud database is now connected to Langflow as a knowledge base provider. To create a knowledge base using this provider, see Create a knowledge base.
OpenSearch
To use OpenSearch as a database provider, you need a running OpenSearch cluster that is accessible to your Langflow instance. This example uses an OpenSearch container running locally, but you can also use a remote OpenSearch instance.
-
For this example, start a local OpenSearch container with security disabled. This allows you to connect without a username, password, or TLS. This configuration is for example purposes only; it isn't recommended in production environments.
podman run -d \
  --name opensearch \
  -p 9200:9200 \
  -p 9600:9600 \
  -e "discovery.type=single-node" \
  -e "plugins.security.disabled=true" \
  -e "OPENSEARCH_INITIAL_ADMIN_PASSWORD=YOUR_OPENSEARCH_PASSWORD" \
opensearchproject/opensearch:latestnoteOpenSearch 3.x requires
OPENSEARCH_INITIAL_ADMIN_PASSWORDto be set even when security is disabled.If the password fails validation, container startup exits immediately with
Password failed validation.The password must adhere to the https://docs.opensearch.org/latest/security/configuration/demo-configuration/#setting-up-a-custom-admin-password[OpenSearch password complexity requirements].
-
Verify the cluster is reachable:
curl -s http://localhost:9200A successful response indicates that the container has started and can receive requests:
{
  "name" : "your-node-name",
  "cluster_name" : "docker-cluster",
  "version" : {
    "distribution" : "opensearch",
    "number" : "3.6.0"
  },
  "tagline" : "The OpenSearch Project: https://opensearch.org/"
}
If you get no response or a connection error, the container might still be starting. Wait a few seconds and try again.
-
To connect the OpenSearch database to Langflow as a knowledge base, click Settings, and then click DB Providers.
-
Select OpenSearch.
-
Enter the following values for the local OpenSearch container:
- Cluster URL: Enter
http://localhost:9200. - Username: Leave blank if security is disabled. Otherwise, enter your basic auth username.
- Password: Leave blank if security is disabled. Otherwise, enter your basic auth password.
- Default Index name: Enter
langflow_knowledge. The OpenSearch index to write and read from. This index is created in the later ingestion step, so it isn't immediately available. - Vector field: Enter
vector_field. The document field for storing the embedding vector. - Text field: Enter
text. The document field for storing the chunk text. - Use TLS (HTTPS): Turn off. Enable if your cluster uses HTTPS.
- Verify TLS certificate: Turn off. Enable if your cluster uses CA-signed certificates.
tipThe knowledge base name doesn't need to match the OpenSearch index name — it is the internal label used to scope searches within the shared OpenSearch index.
- Cluster URL: Enter
-
Click Save and Use OpenSearch.
Optionally, click Test Connection to verify that Langflow can reach your OpenSearch cluster before saving.
The OpenSearch database is now connected to Langflow as a knowledge base provider.
To create a knowledge base using this provider, see Create a knowledge base.
See also
Was this page helpful?